Tuesday 23 February 2010
Thursday 22 October 2009
8 SHOT JOURNEY EVALUATION AND NOTES
Our second project was to construct an 8 Shot Journey, with video cameras, this was too film someone on a journey to a destination in 8 shots, showing variety, depth and effects. Using creative camera angles such as a Dutch tilt.
We then edited it the computer on software called Final Cut, choosing our edit points and putting in correct order, so it flowed, and came out better.
My idea was to have someone being hungry and simply walking from their class to the Café, using a variety of Camera effects, including: High shots, low shots, tracking and over the shoulder.
I chose locations inside the college as the camera had more to focus on and the doors and floors were simple but effective and can be used to add depth to a camera shot. Some of the camera shots we had took a few takes as I wasn’t used to cameras, but as I did get used to them the takes became better and in the end it went how I wanted it to when I watched it back on Final Cut.
I used all the shots I planned as well without changing and it worked very well, better than it thought, as this was really my first experience of filming. And in future I will be able to do it easier.
I aimed to make it flow really well and go from shot to shot without skipping from place to place, but as I really wanted to do a high shot off the second floor balcony looking over at the Atrium this wasn’t possible for it totally flow, but it did go in order, which was the main thing.
The high shot looking down from the balcony was really effective and the one that looked most impressive in my opinion, so it was important I used this.
FIRST SHOT TV STUDIO (MID SHOT)
My first shot was a shot by the door as the person decided to go to the café, rubbing his stomach as he walked out, he then walked to the door and out, the camera was left running until the door shut to add effect. It was a normal mid shot just to introduce the theme of the story. I thought it went well, it was a bit plain, but then I didn’t want to over complicate it and I think it worked well, and introduced it well, simple but effective.
SECOND SHOT MEDIA CORRIDOR, GROUND FLOOR (LONG SHOT TO CLOSE UP.
I enjoyed doing this shot because I thought it was effective, I had the actor walk at the camera so he walked through the camera, I found it quite effective because as he gradually came closer to the camera, so the shot became more clearer and effective. It was good for the next shot to follow on from.
THIRD SHOT SECOND HALF OF CORRIDOR (LOW SHOT)
The third shot once he had passed the camera, was a low shot of the person’s feet walking past the toilets on his way to the Atrium. Showing the feet as they walk out of the door, shows a good variety of shots, it is a bit out of the ordinary, but still fits in with the rest of the film.
FOURTH SHOT TOILETS GROUND FLOOR (OVER SHOULDER)
This shot shows him going past the camera and looking over his shoulder and he is in shot until he reaches the door and goes from it, I chose this picture because it once again shows a different effective angle.
FIFTH SHOT DOOR (CLOSE UP)
This shot is of the door handle to the Atrium. It takes a close-up of the door handle being opened and shut, and it adds good effect. The camera then stopped, when the door is shut, that is when it switches to the next shot
SIXTH SHOT. DOOR OUT TO THE ATRIUM. (OVER SHOULDER).
This is an over the shoulder shot of the actor walking out into the atrium in front of loads of people who are unknowing extras and help with the atmosphere and relevance of the shot. He walks over to the café and then out of shot, this is when the shot is finished.
SEVENTH SHOT. FIRST FLOOR BALCONY LOOKING DOWN AT ATRIUM. (HIGH SHOT).
This was my favourite shot to do and for effect, I enjoyed it because it is out of the ordinary but still gives a good view of the shot I wanted to get. It has depth as it is taken behind the balcony barriers. It shows him walking into the café.
EIGHT SHOT. CAFÉ. LOW ANGLE SHOT.
I took this shot from behind the actor as he walked into the café, looked at him walking in, he then picked up his food and rubs his stomach this is when it ends. This is a good ending because it quite simply shows his destination.
When I had finished everything I edited the video on the editing software, I did this so it became tighter, so the endings were cut off and all the bad takes were disconnected from the tape. As well as this we could put credits and a title in to introduce and finish the project. We also then put it on a DVD and the project was complete.
I was overall very happy with my video as I had never done this before and it looked very good, I think everyone in the group got on with the task well and performed well on it.
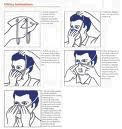
Notes on Filming
Pre Production should include:.Storyboards .Chose an appropriate location
.Props
.Script
Production: .Shooting.Gathering .Sound
Post Production:
.Editing..Getting clips
.Evaluation
All this should be kept simple.
Frame – a single cell of a film when put together is a shot.
Shot - A continuous strip of motion picture film, created by a series of frames.
Scene – Part of the film that happens in one location, includes a lot of shots.
We then edited it the computer on software called Final Cut, choosing our edit points and putting in correct order, so it flowed, and came out better.
My idea was to have someone being hungry and simply walking from their class to the Café, using a variety of Camera effects, including: High shots, low shots, tracking and over the shoulder.
I chose locations inside the college as the camera had more to focus on and the doors and floors were simple but effective and can be used to add depth to a camera shot. Some of the camera shots we had took a few takes as I wasn’t used to cameras, but as I did get used to them the takes became better and in the end it went how I wanted it to when I watched it back on Final Cut.
I used all the shots I planned as well without changing and it worked very well, better than it thought, as this was really my first experience of filming. And in future I will be able to do it easier.
I aimed to make it flow really well and go from shot to shot without skipping from place to place, but as I really wanted to do a high shot off the second floor balcony looking over at the Atrium this wasn’t possible for it totally flow, but it did go in order, which was the main thing.
The high shot looking down from the balcony was really effective and the one that looked most impressive in my opinion, so it was important I used this.
FIRST SHOT TV STUDIO (MID SHOT)
My first shot was a shot by the door as the person decided to go to the café, rubbing his stomach as he walked out, he then walked to the door and out, the camera was left running until the door shut to add effect. It was a normal mid shot just to introduce the theme of the story. I thought it went well, it was a bit plain, but then I didn’t want to over complicate it and I think it worked well, and introduced it well, simple but effective.
SECOND SHOT MEDIA CORRIDOR, GROUND FLOOR (LONG SHOT TO CLOSE UP.
I enjoyed doing this shot because I thought it was effective, I had the actor walk at the camera so he walked through the camera, I found it quite effective because as he gradually came closer to the camera, so the shot became more clearer and effective. It was good for the next shot to follow on from.
THIRD SHOT SECOND HALF OF CORRIDOR (LOW SHOT)
The third shot once he had passed the camera, was a low shot of the person’s feet walking past the toilets on his way to the Atrium. Showing the feet as they walk out of the door, shows a good variety of shots, it is a bit out of the ordinary, but still fits in with the rest of the film.
FOURTH SHOT TOILETS GROUND FLOOR (OVER SHOULDER)
This shot shows him going past the camera and looking over his shoulder and he is in shot until he reaches the door and goes from it, I chose this picture because it once again shows a different effective angle.
FIFTH SHOT DOOR (CLOSE UP)
This shot is of the door handle to the Atrium. It takes a close-up of the door handle being opened and shut, and it adds good effect. The camera then stopped, when the door is shut, that is when it switches to the next shot
SIXTH SHOT. DOOR OUT TO THE ATRIUM. (OVER SHOULDER).
This is an over the shoulder shot of the actor walking out into the atrium in front of loads of people who are unknowing extras and help with the atmosphere and relevance of the shot. He walks over to the café and then out of shot, this is when the shot is finished.
SEVENTH SHOT. FIRST FLOOR BALCONY LOOKING DOWN AT ATRIUM. (HIGH SHOT).
This was my favourite shot to do and for effect, I enjoyed it because it is out of the ordinary but still gives a good view of the shot I wanted to get. It has depth as it is taken behind the balcony barriers. It shows him walking into the café.
EIGHT SHOT. CAFÉ. LOW ANGLE SHOT.
I took this shot from behind the actor as he walked into the café, looked at him walking in, he then picked up his food and rubs his stomach this is when it ends. This is a good ending because it quite simply shows his destination.
When I had finished everything I edited the video on the editing software, I did this so it became tighter, so the endings were cut off and all the bad takes were disconnected from the tape. As well as this we could put credits and a title in to introduce and finish the project. We also then put it on a DVD and the project was complete.
I was overall very happy with my video as I had never done this before and it looked very good, I think everyone in the group got on with the task well and performed well on it.
Notes on Filming
Pre Production should include:.Storyboards .Chose an appropriate location
.Props
.Script
Production: .Shooting.Gathering .Sound
Post Production:
.Editing..Getting clips
.Evaluation
All this should be kept simple.
Frame – a single cell of a film when put together is a shot.
Shot - A continuous strip of motion picture film, created by a series of frames.
Scene – Part of the film that happens in one location, includes a lot of shots.
Tuesday 20 October 2009
Radio Production
For our first task in the rotations we worked with the programme “Sound booth” To make Radio jingles and learn how sound can be adapted and ordered to suit how the user wants it, and how radio can organise it’s material, I found it very interesting and a lot easier than I thought it would be.
The task we had been given was to make three Radio Jingles. One to promote a show, For the news and the other was an ident for the show. It was good to be able to mix sounds and effects to make it sound good and in the end it did come out quite well, although it could be better if I did it again because I’d understand the programme better.
We used SoundBooth as it would enable us to mix music, styles and effects that we wanted. For example you can fade out a song and play with the volume so two things can `be playing and you can hear one thing over the other.
I wanted to transport information over the top f the music with my voice, the date, the time, what was the USP of the show etc.
My plan was to make them flow well and appeal to the audience, and grab their attention. With relevant material to the show, so for example; as I advertised my show as one to show the latest music, on my ident and show promo I put snippets of songs in to add relevance.
When we had finished and listened back to them I was happy with the way it went, I didn’t think it sounded as good as I had thought it would, because I had got the volumes slightly wrong, but this mistake can be corrected next time I use the programme. But as a first attempt as I have had no experience on
sound producing programme before, I was amazed how far I’d come, how much I’d done and how much I’d understood.
Overall I was happy with the amount I learned, and got done over the week, although it wasn’t perfect, as an amateur at Radio Production I thought it was a good effort and I’m sure next time we come round to doing it I will be better. I now have the basic knowledge of how a radio show is produced, in basic anyway.
My jingles
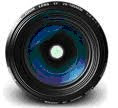
Photography and Pin Hole Camera Evaluation
This week I have been bombarded about information on Photography, but I have taken it all in and have thoroughly enjoyed working with it and think I was successful with it, despite missing the first two days of work. Before the start of the week I had only done work on photography for work experience, and therefore have never been properly run through the ins and outs.
I found it fascinating that a Pringle tube, with some paper and a pin-sized hole could create such good pictures, and work so well. This enabled me to learn how, where and in what ways photos could be taken.
I have now established that a photo is taken by light radiation, hence why the flash is needed in the dark usually to create light for the photo to be taken, light is put through the aperture and then the lens. And that an overview of how a photo works is, radiation on a sensitive medium.
Photo’s used in…..
Photo’s can be used on many different levels and businesses. For example sport photography is usually snapshots of the competitor in action therefore they are usually moving when the image is taken.
Different methods can be used in:
Food


And in most aspects of life, photo’s are usually not far away.
Focus: How sharp the user desires, by adjusting the size of the lens.
Focus: How sharp the user desires, by adjusting the size of the lens.

Aperture: Controls the amount of light passing through the lens.

Shutter Speed: Different shutter speeds affects the timing of the photograph and how it is taking therefore reducing or increasing light and intensity.
Contrast: Changing visual aspects of the image, making it sharper or denser.
Black and White: Colour taken out of the image.
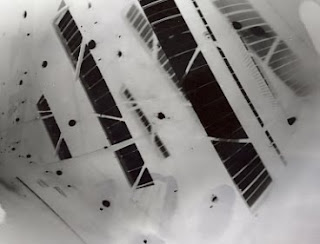
Our pin hole cameras worked well, we took photos inside and outside. However as I was away for the first two days I was behind and only manager to take 3 photos all of which worked well:
One inside the Atrium:
Contrast: Changing visual aspects of the image, making it sharper or denser.
Black and White: Colour taken out of the image.
Our pin hole cameras worked well, we took photos inside and outside. However as I was away for the first two days I was behind and only manager to take 3 photos all of which worked well:
One inside the Atrium:

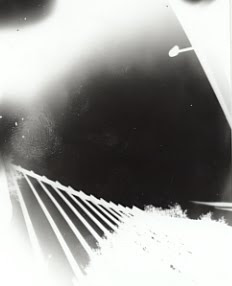
One outside looking up at the fence to the college:

Thursday 15 October 2009
Welcome To Heaven.
Good Morning/Afternoon/Evening. Yes, I accept every time-zone!
This is my blog on my Media work for this year at Suffolk College, i will record all the work i do in my media course onto this page, and you shall all be amazed by it. These will be things like, Vidoes, Photos, and Radio work. And information on them all.
Hope you are dazzled by my work. Nice one...
Louis.
x
Subscribe to:
Posts (Atom)